



LinuxLive USB Creator (LiLi) has been the go-to tool for years. Why? Because it strips away the pain of making bootable drives. It’s free. It’s simple. It turns a standard USB stick into a portable Linux machine.
This isn’t just about tinkering. It’s about flexibility. You can test distributions like Ubuntu or Fedora without touching your main hard drive. You can even install Linux permanently if you want. The real magic, though, is how it keeps your existing data safe while you explore.
Virtualization: Linux Without Rebooting
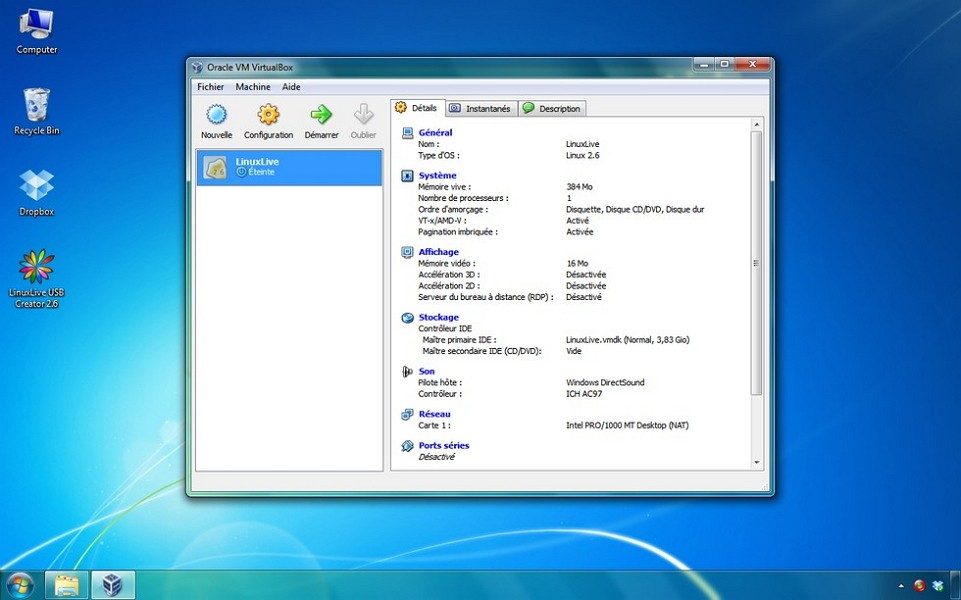
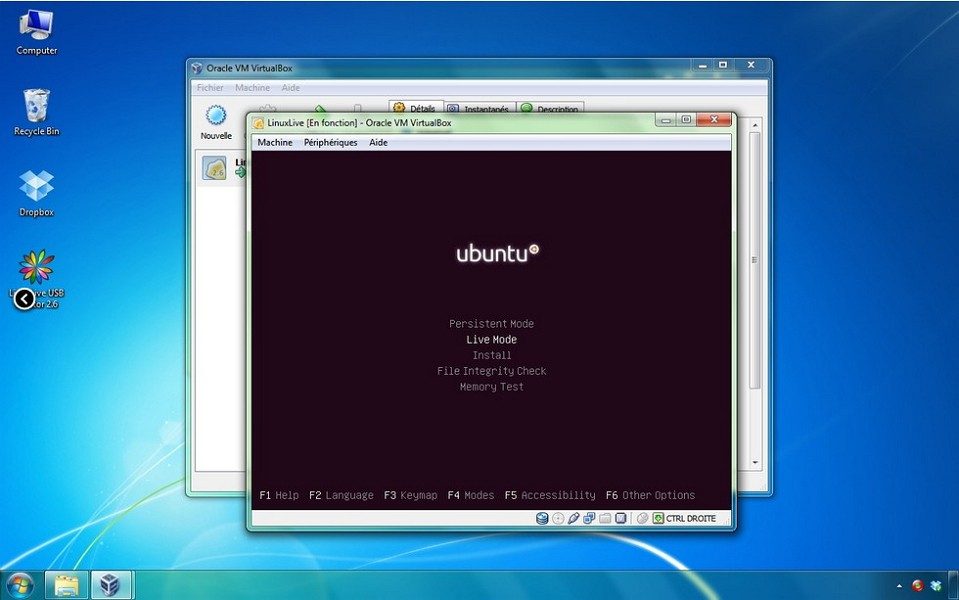
Most people think installing Linux means restarting their PC. LiLi changes that. It uses VirtualBox Portable to run Linux directly from the USB stick inside Windows. No reboot. No dual-boot partitioning.
This is huge for students and teachers. It creates a sandboxed environment. You can break things, learn, and reset without fear. It democratizes open source by making it accessible even to those who are terrified of command lines.
Think about how much easier it is to try Linux when you don’t have to wipe your system first.
Who Actually Uses It?
It’s not just hobbyists. IT pros use LiLi for diagnostics. They boot into a Linux environment to fix a broken Windows install or recover data. For regular users, it’s a risk-free way to see if Linux fits their workflow before committing.
It handles the heavy lifting. You pick a distro. You plug in the drive. You click go. Simple.
Installation and Compatibility
Getting started is straightforward. The software is Windows-only. That’s a hard limit. If you are on macOS, Linux, or mobile, you need alternatives like Etcher or UNetbootin. But for Windows users, compatibility is broad. It runs on XP, Vista, 7, 8, 10, and 11.
The process is almost too easy:
1. Download the installer.
2. Insert a USB drive (at least 4GB).
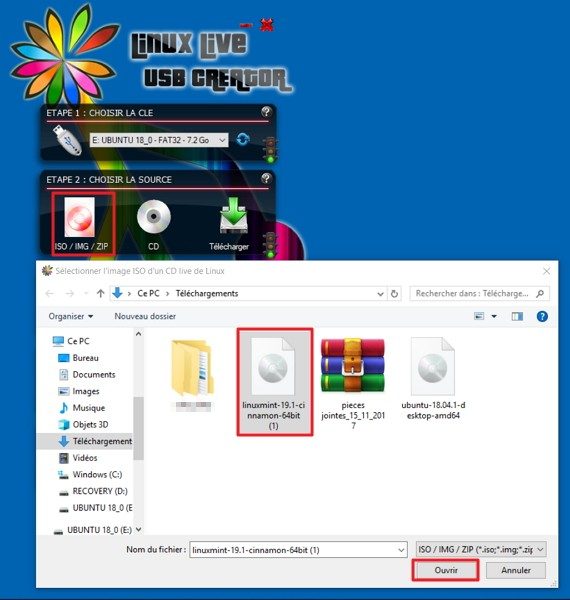
3. Choose an ISO or let LiLi download one.
4. Hit start.
The interface guides you. No admin skills required. Just patience for a few minutes while it writes the data.
Hardware Matters
Don’t skimp on the USB stick. Cheap drives fail during the write process. Use a quality 4GB stick minimum. For heavier distros, go bigger. Once created, that drive works on any compatible computer. It’s a portable OS in your pocket.
It’s a specific tool for a specific job. Does it replace advanced partitioning tools? No. But for most people wanting to try Linux without the hassle, it hits the sweet spot.
The question isn’t really whether you need it. It’s whether you have enough free time to not use it.

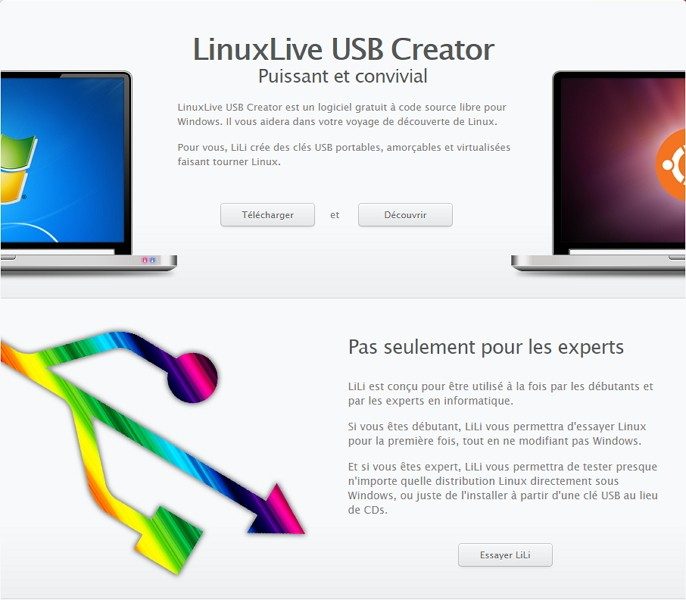
LinuxLive USB Creator (LiLi) simplifie la création de supports USB bootables Linux. L’outil est gratuit, léger et conçu pour être intuitif. Il permet de tester, d’installer ou d’emporter votre distribution préférée en quelques clics.
Comparaison avec Rufus et UNetbootin
Le marché des outils de création d’USB regorge d’applications. Il est légitime de se demander ce qui distingue LinuxLive USB Creator des autres.
Contrairement à Rufus ou UNetbootin, LiLi mise sur une fonctionnalité de virtualisation portable. Il n’exige pas l’installation de logiciels complémentaires pour fonctionner. Rufus se distingue par sa prise en charge étendue des formats de fichiers. Il gère aussi les images ISO non-Linux avec une compatibilité accrue.
LiLi cible un public spécifique. Il s’adresse à ceux qui veulent découvrir ou déployer Linux facilement. La priorité est donnée à la simplicité et à la polyvalence.
Le choix dépend de vos besoins précis.
– Pour une utilisation rapide : Si vous privilégiez la vitesse sans configuration manuelle, LiLi est un choix privilégié. Vous pouvez même tester la distribution directement sous Windows via la fonction portable.
– Pour la compatibilité ancienne : Les utilisateurs avec des contraintes techniques fortes ou cherchant à supporter de vieilles distributions peuvent basculer vers LiLi. L’outil intègre des profils optimisés pour de nombreux systèmes. Les mises à jour régulières assurent la prise en charge des nouveautés open source.
Où et comment télécharger LinuxLive USB Creator
L’accès au logiciel est libre. Il n’existe qu’une version gratuite. Elle est accessible à tous, étudiants compris, sans restriction professionnelle.
Les archives officielles permettent d’accéder aux anciennes versions. Cette option est utile pour la compatibilité matérielle ancienne ou si une mise à jour récente ne répond pas à un besoin spécifique.
La gestion des mises à jour reste essentielle. Elle garantit les améliorations de sécurité et le support des nouveaux modèles de clés USB. Vérifiez régulièrement la disponibilité des nouvelles versions. Vous pouvez le faire via les plateformes fiables ou directement dans l’interface du logiciel, qui propose souvent un lien vers les dernières moutures.
Formation et accessibilité
Aucune certification n’est requise pour utiliser LinuxLive USB Creator. Le concepteur a choisi de rendre l’outil totalement libre et ouvert.
Les ressources en ligne facilitent l’apprentissage. Guides, tutoriels vidéo et forums d’utilisateurs permettent de maîtriser les fonctionnalités essentielles rapidement. Cette démarche contribue à la démocratisation de l’usage de Linux sur clé USB. Elle rend l’outil accessible à un large public.
Sécurité et mises à jour
La sécurité des opérations est un impératif. Le logiciel assure que l’installation sur la clé USB est propre. Il exclut les éléments indésirables ou potentiellement malveillants. Ceci suppose bien sûr de télécharger l’exécutable depuis une source fiable.
Une clé USB amorçable peut répondre à des exigences de sécurité élevées. Elle permet d’intervenir sur des postes infectés. Elle garantit la confidentialité lors de navigations web. Elle donne accès à un système isolé du disque dur principal.
La pérennité de LiLi repose sur ses évolutions régulières. Le logiciel prend en charge les distributions Linux nouvellement sorties. Il corrige rapidement les problèmes signalés par la communauté.
Vous pouvez forcer la mise à jour via le menu du logiciel. Ou téléchargez manuellement la dernière version sur le site officiel. Cette démarche garantit la compatibilité avec les dernières architectures matérielles. Elle maintient un haut niveau de sécurité logicielle face aux nouveaux standards de l’écosystème Linux.
Vers une informatique plus libre
LinuxLive USB Creator s’inscrit dans la dynamique de démocratisation du logiciel libre. Il offre la possibilité à chacun d’explorer l’univers Linux. Vous pouvez vous familiariser avec différents environnements graphiques et outils open source. L’outil favorise une transition progressive vers une informatique plus flexible et respectueuse de la vie privée.
La réactivité de la communauté et la richesse des ressources en ligne renforcent l’intérêt du logiciel. Il aide ceux qui souhaitent approfondir leurs connaissances en solutions portables Linux.
Avec sa simplicité, sa gratuité et sa compatibilité étendue avec Windows, LinuxLive USB Creator reste une solution de premier plan. Il sert à la création de supports USB bootables. Il aide à l’initiation au monde Linux et au dépannage informatique.
Que ce soit pour équiper un environnement de secours portable, tester de nouveaux systèmes ou accompagner l’apprentissage, LiLi répond à des besoins variés. Il s’inscrit dans la tradition du partage et de l’accessibilité promue par la communauté open source. La clé reste dans votre poche, prête à déverrouiller d’autres possibilities.
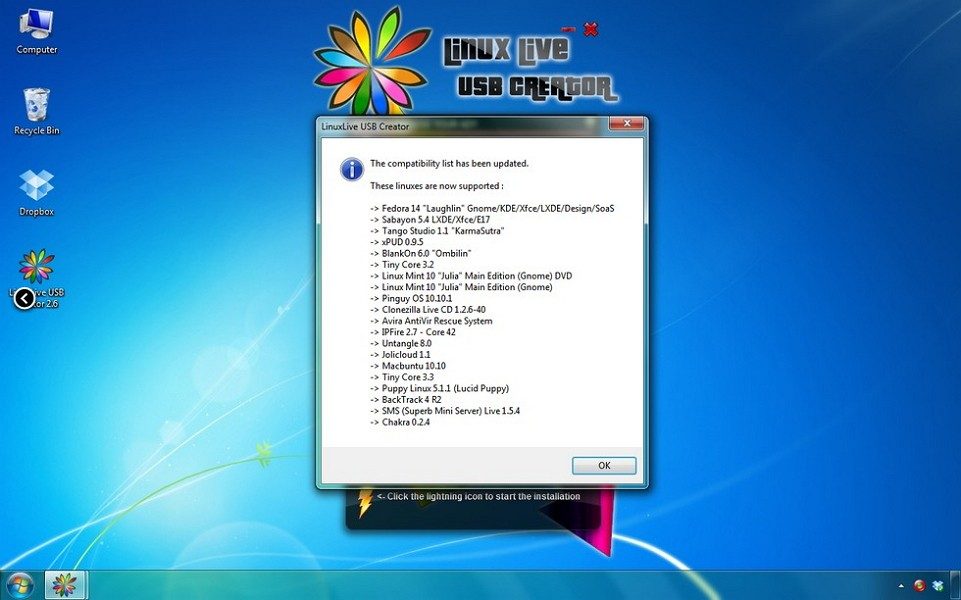
You are about to download a tool that feels like it stopped in time, yet it still works. LinuxLive USB Creator (LiLi) is a legacy utility. It builds bootable Linux USB drives on Windows. It also offers a quirky feature: running Linux inside Windows via VirtualBox before you ever restart your PC.
The interface is simple. Maybe too simple for some. But for others, that simplicity is the only thing standing between them and a working rescue disk.
What the software actually does
LiLi takes an ISO file from a Linux distribution. It writes it to a USB stick. It configures the bootloader. You can then boot from that stick. This is the primary function.
There is a secondary function. The installer includes a portable version of Oracle VirtualBox. You can launch an ISO directly from within Windows. No reboot required. It tests the live environment. It checks for hardware compatibility. It is a safety net before you commit to a full install or wipe your hard drive.
Technical requirements and limits
The tool is freeware. It is not open source. It does not receive frequent updates. The developer is LinuxLive. The category is bootable system tools.
It runs on Windows. Almost all of them.
– Windows XP
– Windows Vista
– Windows 7
– Windows 8
– Windows 8.1
– Windows 10
– Windows 11
Both 32-bit and 64-bit versions are supported. This matters because many users are still on older hardware or enterprise machines that haven’t migrated to 64-bit.
The application is an installer. It also has a portable component. You can run it from a USB drive itself if you need to create another USB drive on a different machine.
How persistence and booting work
Not all Linux distributions support persistence. Persistence means saving your files and settings to the USB drive. You close the session. You open it again. Your work is there.
LiLi allows you to configure a persistent storage space. The size depends on the ISO and the distribution. If the distro does not support persistence, the feature is grayed out or ignored. You must check the specific Linux version you are downloading.
Boot compatibility varies. You have BIOS. You have UEFI. The success depends on the distribution you choose and the firmware on your motherboard. LiLi attempts to handle both. It does not always succeed on very new UEFI systems with secure boot enabled. That is a known limitation.
Hardware and installation notes
You need a USB drive. At least 4 GB. More if you want persistence. SanDisk or Kingston sticks work best. Cheap no-name drives often fail during the write process.
The installer is lightweight. It does not consume much RAM. It does not need a fast CPU. It just needs administrative rights to write to the drive and modify the bootloader.
Download the ISO from the official distribution site. Or use LiLi’s built-in downloader. The downloader fetches the ISO automatically. It saves a step. But it requires an internet connection. Without it, you must provide the ISO file manually.
Why people still use it
Modern tools exist. Rufus is faster. Ventoy is more flexible. BalenaEtcher is cross-platform. So why LiLi?
Because it includes VirtualBox. Most other tools do not. You can test a Linux distro in a window. You can see if it detects your Wi-Fi card. You can check if the screen resolution is correct. You can do this without touching your boot sector.
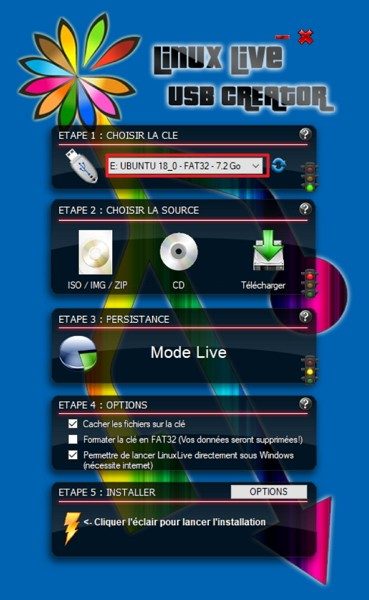
It is also straightforward. You select the ISO. You select the drive. You click create. It handles the partitioning. It formats the drive. It copies files. It sets up the bootloader.
The tool is a pragmatic choice for users who want to verify a Linux distribution before committing to a dual-boot setup or a full installation on Windows.
The catch
The software is not updated regularly. Newer Windows features sometimes break compatibility. Secure Boot on modern motherboards may block the boot process created by LiLi. You may need to disable Secure Boot in your BIOS. You may need to switch from UEFI to Legacy BIOS mode. It is a trade-off. Simplicity




The Hidden Costs of the Upgrade
You think you’re getting a smoother ride with the latest OS update. You’re not. You’re getting a bill.
Microsoft’s Windows 11 24H2 update didn’t just bring AI features. It brought a new tracking layer. One that looks for you. Not your documents. You. The way you move the mouse. The rhythm of your typing. It’s all data. And it’s all being sent to the cloud.
This isn’t speculation. It’s in the privacy settings. But most people don’t look. They click “Accept.” They want the Copilot integration. They want the new Start menu that actually looks like something. So they trade their behavioral telemetry for convenience.
Why Your Mouse Movements Matter
Why does Microsoft care if you scroll slowly? Or if you click a window three times?
Because attention is the new oil. And they’re drilling on your desktop.
The update enables continuous interaction tracking by default. This feature monitors your usage patterns to optimize Copilot suggestions. It’s smart. It’s useful. For some. But it’s also invasive.
“The system analyzes your interaction habits to tailor AI responses.”
That sentence sounds safe. Until you realize it means your desktop session is being profiled. Not just for ads. For product development. For refining algorithms that predict what you’ll want before you know you want it.
How to Stop the Bleeding
You can stop it. You have to.
Go to Settings. Then Privacy & security. Then Diagnostics & feedback.
Turn off Send optional diagnostic data. Yes. It says “optional.” It’s not. It’s the default. Turning it off stops the heavy telemetry. It doesn’t stop everything. Microsoft still gets crash reports. But it stops the behavioral tracking. The mouse movements. The app switching patterns.
It’s a small change. But it breaks the link between your actions and their cloud servers.
The Trade-Off You Didn’t Agree To
Here’s the thing they don’t tell you. When you turn off diagnostic data, Copilot gets dumber.
Not broken. Just less personalized.
It won’t know you like your emails short. It won’t know you prefer code comments in Spanish. It’s generic. Functional. But cold.
You have to choose. Do you want an AI that knows you? Or an AI that respects your privacy?
Most people don’t know they have a choice. They assume the settings are static. They’re not. They shift with every update. One month it’s telemetry. Next month it’s cloud syncing. The day after that, it’s location history.
The software is learning. You’re just the dataset.
Where the Data Goes
Where does it go? Microsoft’s Azure cloud. Obviously.
But it doesn’t stay there. It’s used to train models. Those models are shared with partners. Some of them are inside the Windows ecosystem. Some are outside.
You’re not just using Windows. You’re fueling an ecosystem. A vast, interconnected web of data collection.
And the worst part? It’s hard to opt out completely. Even with diagnostics turned off, you’re still part of the Windows Insider Program if you signed up. Even if you didn’t mean to. The terms of service change. The boundaries


